Showing posts with label Christmas. Show all posts

10 December 2023

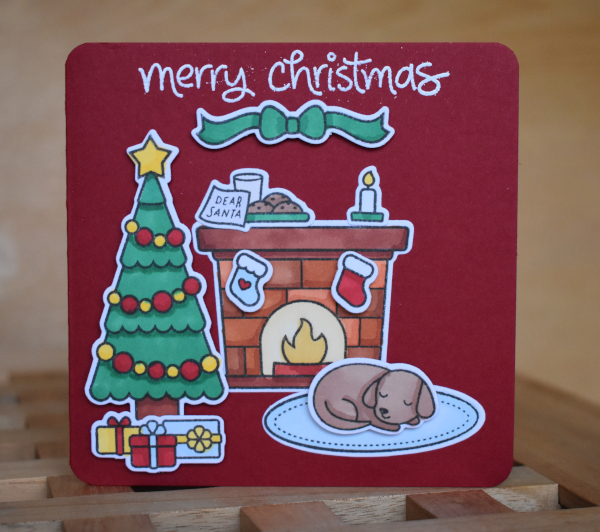
Doggie Dreams of Christmas


Lawn Fawn's Christmas Dreams stamp and die set have been used to make this greeting card


Lawn Fawn's stamp and die sets are really cool as they are usually made up of lots of little stamps that can be put together to make a picture for your card. This means you can pick and choose which pieces to use. For example the Christmas Dreams stamp set comes with both cat and dog but as we have a dog, I have chosen to use that stamp to personalise my card.
Christmas Dreams by Lawn Fawn stamp and die set used to make his card

Last year I made a tag using the same stamp set - if you missed it, click here to see what I did.

Follow the below link to find out how the card was made

15 January 2023

Wrapping Paper Robin


Making a card from some really pretty wrapping paper


I know Christmas seems like ages ago now and we are already half way through January but I was tidying my desk and found some wrapping paper I had saved from Christmas. It was such pretty wrapping paper that I want to show you how to make a beautiful card quite quickly from it. This particular card is a Christmas card but you could make a similar card using birthday or celebration wrapping paper.
Used some robin wrapping paper to make a greeting card


I'm not sure if I have ever mentioned - I like to get my Christmas cards made in January! I know it's early, but the time leading upto Christmas gets so manic and I'm still in Christmas mood in January so I get them done early. I make quite a few Christmas cards each year and I've left making them till October/ November time and run out of time and they never turn out how I would like them to as they are rushed. At least by making them in January, I can take a bit of time and if I need to order items such as card, there's no rush to find some.

Not only that, these cards are made from some wrapping paper I salvaged from Christmas - I need to use it now before it becomes all creased and crumpled !  Isn't it good to recycle?

I've also used a bit of the paper to cover the front of a notebook. This is a notebook that I use for tracking Christmas gifts. As I buy items, I mark it against the people I need to buy for and any ideas, I can also note down. I do buy gifts all year - not purposefully looking, but sometimes you just stumble across a perfect item for someone whilst on holiday for example. I therefore cover my little notebook in Christmassy paper so I don't get it lost amongst my other little notebooks.
Used some robin wrapping paper to cover a notebook

I have made some cards using some birthday wrapping paper in the past - if you missed this click here to be taken to the page
Gift cards made using birthday wrapping paper


Follow the below link to find out how the card was made:

18 December 2022

Origami Gift Box


Make a small gift box by folding a couple of square pieces of paper


This gift box is made up of two parts, a lid and a base. Both made in the same way from square pieces of paper. It doesn't require any gluing - just folding.
Origami Christmas gift box

The origami gift box is made of two parts, the lid and a base


I've used Christmas wrapping paper to make this box. It could be a last minute wrap for a gift or maybe you could make them for Christmas table decorations (my dog doesn't like the cracker bangs, so I make little gift boxes instead and put the joke, hat, chocolate etc into the gift box). 

I've been making these boxes since I was little and once you know how to make them you will never forget. You can make them for any occaision using different papers and in different sizes - just make sure the starting base square is a tad smaller than the lid square (in my example below, I've made the starting base square a centimeter smaller than the lid)

The internal dimensions of the box made in this blog is 7 cm square and just short of 3 . 5 cm deep 
 
You can use almost any type of paper - just make sure it can hold a fold and it's not too thick.


Follow the below link to find out how the box was made

11 December 2022

Peaceful Deer


Use Stampin Up's Peaceful Deer stamp and punch set to make this beautiful Christmas card


Rather than use lots of decorative papers to decorate a card, I have used the stamp set to create the background. Because I have used the stamp set and it's not reliant on a particular printed paper, you can make your card in any colour you wish. I've gone for a festive green.
Use Stampin Up's Peaceful Deer stamp set to make this card


Follow the below link to find out how the card was made

27 November 2022

Christmas Dreams Tag


Make your gift tags as pretty as your greeting cards - this one using Lawn Fawns Christmas Dreams stamp and die sets


I buy fairly basic wrapping paper for my Christmas gifts and then make pretty tags to match the paper. This time, I thought I'd use a stamp set and make a tag similar to making a greeting card.
Use Lawn Fawns Christmas Dreams stamp and die set to create this gift tag


I've got friends and family who have dogs, so this tag would be ideal for them :) .  The stamp set comes with a cat too for those who prefer cats.

Follow the below link to find out how the card was made

20 November 2022

Giant Holiday Message Tag


Make really easy tags using Lawn Fawns Giant Holiday Message Tag stamp set


Sometimes you just need a quick tag for a last minute gift. This is a really easy way to make a tag and doesnt take very long at all.
Christmas gift tag made with Lawn Fawns Giant Holiday Message tag


I've made mine red and white to match my wrapping paper - but because you are making them yourself, you can change the colours to match any wrapping paper.

The tag could be added to a blank greeting card as a topper.

Follow the below link to find out how the card was made

13 November 2022

Gonk Christmas


Make this fun Christmas card using a large Gonk stamp


These gonk images have been quite popular recently but I often struggle using larger stamps especially if I do not want a large card such as A5. I have created a card base that has a shorter front panel so that you can see the right hand part of the back panel from the front. Just makes it a little different from the norm!
Use Woodwares Christmas tree gnome stamp to create this fun card


I just love the phrase - 'It's beginning to look a lot like Christmas' - and teamed up with the Gonk image it just makes me giggle that he looks ready for Christmas :)

Follow the below link to find out how the card was made

20 February 2022

Tea Light Decoration


Make these cute little tea light decorations to light up these dark evenings


This week has been quite overcast and my thoughts turned back to Christmas when my house was covered in lights which created such a cosy feeling So this weeks blog will show you how to turn a homemade bakers box into a tea light decoration for a little battery operated tea light. Please don't use wax candle tea lights as you would set light to your house and that's obviously not a good idea.
decorative boxes made from card to hold a tea light


I started off making a leaf patterned tea light decoration but then thought it could easily be used for other occasions, so I went on to make a heart one for valentines or anniversaries and a Christmas one (not that I probably need any more lights at Christmas !)

I decided to have a tie top on the box, so it could be undone to turn the light on and off. However once I had done that, I realised that actually it would be easier to seal the top with a miniature peg rather than keep tying and untying a ribbon. So my photo's may show two holes in the top of the box - just ignore them, unless you obviously wish to have a ribbon tying the top of your box together

I've made mine from a bakers box die but you can use any box die you have. If you don't have any applicable dies, scroll down to the bottom of this blog and I will show you how to fold a box using card and a guillotine with scoring and cutting blades

Follow the below link to find out how the tea light box was made

19 December 2021

Parcel Bow


Make a beautiful paper bow to decorate your gift


I love decorating my gift parcels, so this week I thought I'd try and make a bow.
Paper parcel bow made from a piece of A4 printed copier paper


I've made this bow out of a piece of A4 printer paper that I printed some Christmas patterns onto, but you could use some wrapping paper - just as long as it's not too thick. If it was too thick, the paper wouldn't curl as well. This particular print was part of a digital scrapbooking kit I purchased from Nitwit Collections - click here to be taken to the website.

I've used Tombow multi liquid glue to hold the bow together. It's my favourite glue as it sticks almost anything together. You could use staples, hot glue gun or double sided tape. It needs to be a really strong glue to ensure your bow does not uncurl!

Follow the below link to find out how the bow was made

05 December 2021

Decorative photoframe


Make a decorative photoframe as a gift or just to decorate your home if you have a favourite photograph


This is a really simple gift to make and you can use whatever you have in your craft stash to decorate the frame. I have made a Christmas photoframe for a photo of my dog to decorate the living room. At this time of year in the UK, we often have our children's school photo's that we give to relatives - how nice would it be to decorate the frame as well?
Photoframe decorated with green die cut foliage and red buttons


I've just used a little bit of coloured card, a few dies and some random buttons I had in my stash. Below I'll show you lots of ideas that you could do to make a Christmas photo frame. It doesn't have to be a Christmas photo frame - you could use flowers, leaves, balloons, stars or any other stamps or images you have.

I have used a cheap photo frame - it really doesn't need to cost much and you could even slightly sand it and paint it before adding your decorations. The great thing with this gift, is you can play around with the decorations and keep changing your mind until you are happy with the composition. Once happy, then just glue everything down.  

Follow the below link to find out how the frame was made

28 November 2021

Photo Greeting Card


Use a favourite photo to make a greeting card - It's just like scrapbooking


I've made a Christmas greeting card with the main image being a photo that was taken last year of our dog - she doesn't look very impressed does she? :) I didn't get many photo's before she knocked the antlers off!
Scrapbooking style greeting card using a photo


I wanted to show you that you could easily make a Christmas card using the same skills as scrapbooking. For those that have not heard of scrapbooking - it's a way of making a photo album but you use special acid free patterned papers and decorate the page with your photo's, buttons, ribbons, tickets, die cuts, stamps and finish it off with a bit of journaling to describe the photo.

My card is relatively plain compared to most scrapbooking pages. But scrapbooking is very personal - you make it to please your eye. If you made your card without a greeting on the front, it could always be framed after the recipient has received it.

I've used a picture of my dog, but it could easily be a lovely snowy scene, your children, family or photo's of food! I've also used a digital photo that I have made smaller using a free piece of software called Gimp (You can download it here). I'll show you how easy it is to make your photo's smaller. You could just as easily use a pre printed photo if the sizing of the image works for your card.

Follow the below link to find out how the card was made
21 November 2021

Snowflake Snowman Card


Cut a snowflake from white paper to create a snowman's tummy


This card was inspired by the snowflake paper cutting technique that you normally do as a child - where you fold a piece of square paper then cut out shapes from the edges. I haven't done this for some years and it was very exciting to unfold the paper to see what sort of snowflake I had created.
Snowman greeting card with snowflake tummy


The snowflake then becomes the snowman's snowy tummy. His head is made in a similar way to the gift wrap I made in last weeks blog. (If you didn't see that, click here - it makes such a fab gift wrap for a small gift or some chocolate)

Follow the below link to find out how the card was made

14 November 2021

Snowman Gift Wrapper


Create this gift wrapper in the shape of a snowman to hold a small gift or some chocolate or sweets.


This cute little character is made from mainly white card with a few scraps of coloured card and some random buttons. I thought it made a lovely wrapping solution for a small gift. It's another one of those items I remembered seeing online or in a magazine somewhere and have always wanted to make one. I think he turned out really well and is very cute.
Snowman gift wrapper made form white card, decorated with coloured buttons

 
If you don't have random buttons or some of the dies I have used to decorate him, then just use what you have in your craft stash. Why not add snowflakes instead of the buttons or holly leaves?
 
You could add the recipients name to a tag coming out of his hat band and use them as name places for your Christmas table.

Follow the below link to find out how the gift wrapper was made

07 November 2021

Christmas Gift Pocket


Make a simple cute pocket for gifts out of a piece of 12 x 12 scrapbooking paper


How cute is this little gift pocket? It is made from just one sheet of 12 x 12 inch scrapbooking card and only requires minimal folding.
Folded square of patterned paper with gifts inside


They can be made to hold your gifts or maybe make a batch of them for table gifts. I also made one out of a piece of 6 x 6 inch paper and added a piece of string so it can hang on my Christmas tree - this one is super cute and I'll attach a photo to the bottom of this blog page.

Follow the below link to find out how the gift pocket was made

31 October 2021

Snow Way! It's Christmas already?


Create this multi aperture card and decorate with cute characters


Create a card with real depth - yet it folds flat for easy posting. Your recipient will be surprised to see what's inside :)
Inside of multi aperture card - 3 layers

Front of card with 'Snow Way' greeting


The main reason for doing a blog on this card, is to show you how to make the base card itself. I've decorated it with stamped characters from 'Snow Place' by Stampin Up, however once you have made the base card, you can decorate it with whatever you have.

I made this card using two different sized oval dies but you could just as easily use shaped or plain rectangular dies. They just need to be different sizes. I made a second card using shaped rectangular dies and there is a picture of this one at the bottom of this page.

Follow the below link to find out how the card was made

24 October 2021

Tidings and Trimmings Tag


I'll show you how to make this glorious Christmas gift tag using Stampin Up's Tidings and Trimmings set


This week I have made a gift tag for a Christmas present, however it could as easily be used on the front of a greeting card instead as a topper.
Tag made form Stampin Up's Tidings and Trimmings stamp and die set


I love the papers that match with this stamp and die set - 'Tidings of Christmas'. It may only be a 6 x 6 inch designer paper pad but you can make it go a long way by using a few tricks. This time I have used a fancy rectangular die to cut the tag shape and the second one which looks bigger as it sticks above the first one, is actually the same size - just cut it in half and glued to the top and bottom of the first tag shape. The back is covered with just plain white card for your greeting. No-one is the wiser that you haven't used a bigger piece of card!

The colours of the paper pad all match, so you don't have to use the exact papers I have, just go with which ones you prefer. Why not make a bunch of them all slightly different.

Follow the below link to find out how the tag was made

17 October 2021

Merry and Bright Star


Use Stampin Up's Tidings and Trimmings stamp and die set to make this cut out star card


This die set from Stampin Up, has two large star dies, one just an outline and the other a filigree style star. I used the outline star die to cut a window in the card and then hung a gold filigree style star within the window. The star then floats and spins catching the light.
Merry & Bright greeting card with gold sparkling star hanging in star shaped window


The star is the centre attraction for this card so I felt the rest of the card just needed a little extra decoration of a greeting and a few little stars which all come in the stamp set that goes with the die set. If you have gold embossing powder or gold glitter you could use these to make the little stars and maybe the greeting, sparkle even more.

If you have nesting bell shape dies or even stocking dies, you could make a similar card using them instead of the star.

Follow the below link to find out how the card was made

11 October 2021

Peek-a-boo Cracker


Make a cracker and decorate with the Crafters Companion 'Peek-a-Boo Snowman' stamp and die set


This week I have made a decorative band to fit a cracker using a Peek-a-boo stamp and die set. Thought I had better start preparing my Christmas items as the time is just flying!
Cracker made from 12" card and decorated with Peek-a-boo snowman


The instructions below are to make the decorative wrapper that is sitting around the middle of the cracker. To make the cracker itself, follow my instructions here to make the longer cracker. I used a sheet of 12" card from Let It Snow scrapbooking paper pack by artstudio to make the cracker base and some thin white ribbon to tie the ends.

You can get several different Peek-a-boo character sets such as Elf, Deer or Santa and they would all work in the same way I have used the snowman. You can make these crackers as table decorations and fill with hat, motto and sweets or to wrap a gift. 

Follow the below link to find out how the cracker wrapper was made

15 August 2021

Stamping Aid Template


Make a template and use it in a stamping aid to create a circular stamped image


This weeks blog will show you how to make a template that can be used in your stamping aid (such as Stamparatus or Misti) to create wreath shaped images using any small stamps you have. All you need is some card and a square die to make the template. I have used an 8 cm square die but you can go bigger or slightly smaller.
Floral wreath created with Stamparatus template


I love this floral wreath. It doesn't have to be floral - you can use any small stamps and I will add a photo, at the bottom of this blog of a Christmas card I have made using Stampin Up's Tidings and Trimmings stamp set.

Its quite easy to make the template which can be used again and again.

Follow the below link to find out how the card was made

20 December 2020

Santa's Giftbag


How to make a giftbag using We R Memory Keepers gift bag punch board


This week I needed to make some giftbags for some chocolate gifts for my work colleagues. I used the We R Memory Keepers Gift Bag Punch Board but I've added some instructions at the bottom of the blog for those of you who do not have this tool, so you can make the same thing but with a guillotine with a score blade.
Santa giftbag made using We R Memory Keepers Gift Bag Punch Board


The giftbag is all dressed up like Santa and is quite a good size - 15 cm high by 8 cm wide by 5 cm deep (not including handles). The main body and handles are made out of one sheet of A4 card which most of us have in our stash. I guess you could also make a snowman giftbag but make it white with black buttons for coal and a stripy scarf instead of Santa's collar.

Follow the below link to find out how the giftbag was made